Consistent Character AI Generator: Build a Character Sheet That Helps You Review
Separate character identity from scene changes. Use a clear reference, a compact character sheet, and targeted comparisons to review the same character across poses, angles, and lighting.
·
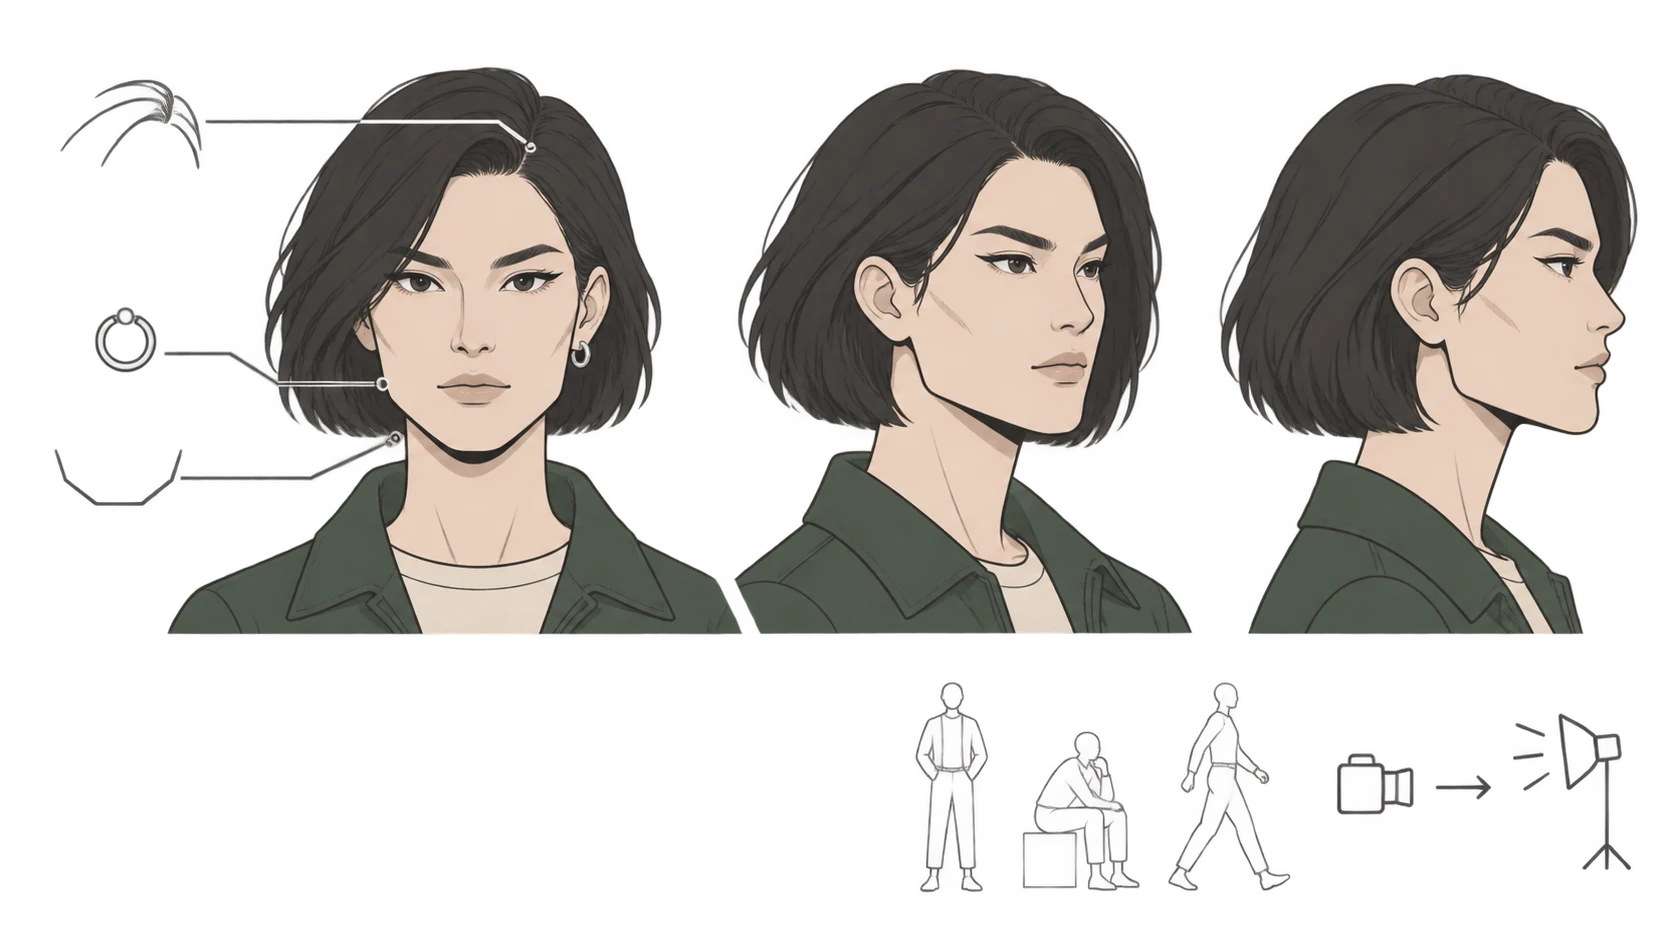
A new setting should not mean a new person. Yet a set of images can share the same illustration style while the character’s jawline, haircut, or signature accessory changes between scenes. When looking for a consistent character AI generator, distinguish visual style from character identity.
Start by defining what must remain recognizable. The workflow below is a suggested creation and review method, not a tool test or a promise that a model can lock an identity.
Write distinguishing features, not just a mood
“Young, brave, cinematic” leaves much of a character’s appearance unspecified. Pixazo’s reference page recommends a clear reference image and descriptions covering clothing, accessories, and distinctive characteristics. Those are useful preparation inputs; they do not establish that an output will be consistent.
Choose a reference for how clearly it shows the face, hairstyle, and important accessories—not only for its atmosphere. A hidden ear does not establish an earring design. A front view does not settle the back of a costume. If you develop additional views, approve those design decisions before treating them as reference material.
A character sheet can be compact. This is a fictional example, not a generated result:
| Feature | Fixed description | Allowed variation |
|---|---|---|
| Face | Square jaw, broad cheekbones | Expression changes without redesigning the facial structure |
| Hair | Black, chin-length bob, parted on the character’s left | Movement without changing the specified length |
| Clothing | Dark green cropped jacket over a cream crew-neck top | Pose-dependent folds; costume changes recorded separately |
| Signature accessory | One silver hoop in the character’s left ear | May be hidden, but should not switch sides without explanation |
Use the character’s left and right, not the viewer’s. Clothing can change when the story calls for it, but make that an explicit scene decision rather than an unspecified variable.
A changed view is not necessarily a changed identity
A profile changes the visible outline. Warm light changes how colors appear. A raised arm may hide a collar. None of these alone proves identity drift.
Compare the reference and candidate side by side. Inspect facial structure, hair silhouette, accessory placement, and garment construction separately. Ask: Has this feature changed, or is it obscured, viewed differently, or lit differently? Mark a feature as “not assessable” when it cannot be seen clearly; do not count missing evidence as a pass.
To make problems easier to locate, avoid changing pose, camera angle, lighting, and costume all at once in your first attempts. Try a different angle while retaining other conditions, then a new action, then the lighting you intend to use. This is a troubleshooting suggestion, not a proven generation recipe. You still need to review the final, more complex scenes.
Carry the same identity description into each scene
Separate the prompt into a stable character description and scene-specific instructions. Reuse the approved identity wording; change the action, camera position, setting, and lighting as needed. Rewriting the character freely for every image can change the instructions themselves.
Once the character sheet and reference material are ready, open InkRoom’s image generation entry to enter a prompt and select a configured model. Reference-image options, available settings, and fees depend on the current interface and account configuration. This entry is not a claim of dedicated identity locking; review each result manually.
Keep the character-sheet version, reference material, prompt, and settings actually used with each candidate. Do not promote an unapproved candidate into the new reference: that can make an unresolved design change the starting point for later images.
Return to the approved reference when something drifts
Name the discrepancy precisely: “the earring moved to the other ear” is more actionable than “the character looks wrong.” Return to the same approved reference and fixed description, check for conflicting instructions, and regenerate around the specific issue. Do not assume a particular setting will repair identity automatically.
If the character is acceptable and only the background or composition needs work, consult the existing-image editing entry and confirm that the current interface offers the operation you need. That is a separate editing branch, not an automatic identity-repair claim. Review the character again after editing.
For a continuing story, judge the images as a set, not only as attractive individual pictures. Each should satisfy the character sheet, and unclear identity details need further review. For commercial work, separately check rights to reference materials and the applicable service terms. Visual consistency does not establish commercial usage rights.
Related articles and cases
- AI Product Mockup Generator: Where Concept Visuals Stop
Explore presentation ideas with product photos and brand references without treating a concept mockup as a product photograph or print proof. Choose the right deliverable and check proportions, text, logos, materials, and lighting.
- AI Comic Storyboard Generator: Make Each Panel Follow the Story
Use an invented short scene to turn a script into panel descriptions, establish character and setting references, and review generated roughs for continuity before lettering and layout.
- AI Background Remover for Product Photos: White, Transparent, and Clean Edges
A white background is not the same as a transparent file. Learn how to check exported product photos, inspect handle openings, glass, fine fibers, and shadows, and flag areas that need manual editing.
- AI image to image generator: change one thing, then check what stayed
Use an existing product or character image with a clear change request and explicit preservation requirements. Learn how to write a focused prompt, review the result, and track cost by usable output rather than candidate count.