AI Photo Restoration: Reviewing Scratches, Blur, and Missing Details
Preserve the original scan, separate damage repair from reconstruction, and compare faces, text, clothing, and backgrounds. A clearer photograph is not necessarily a more reliable historical record.
·
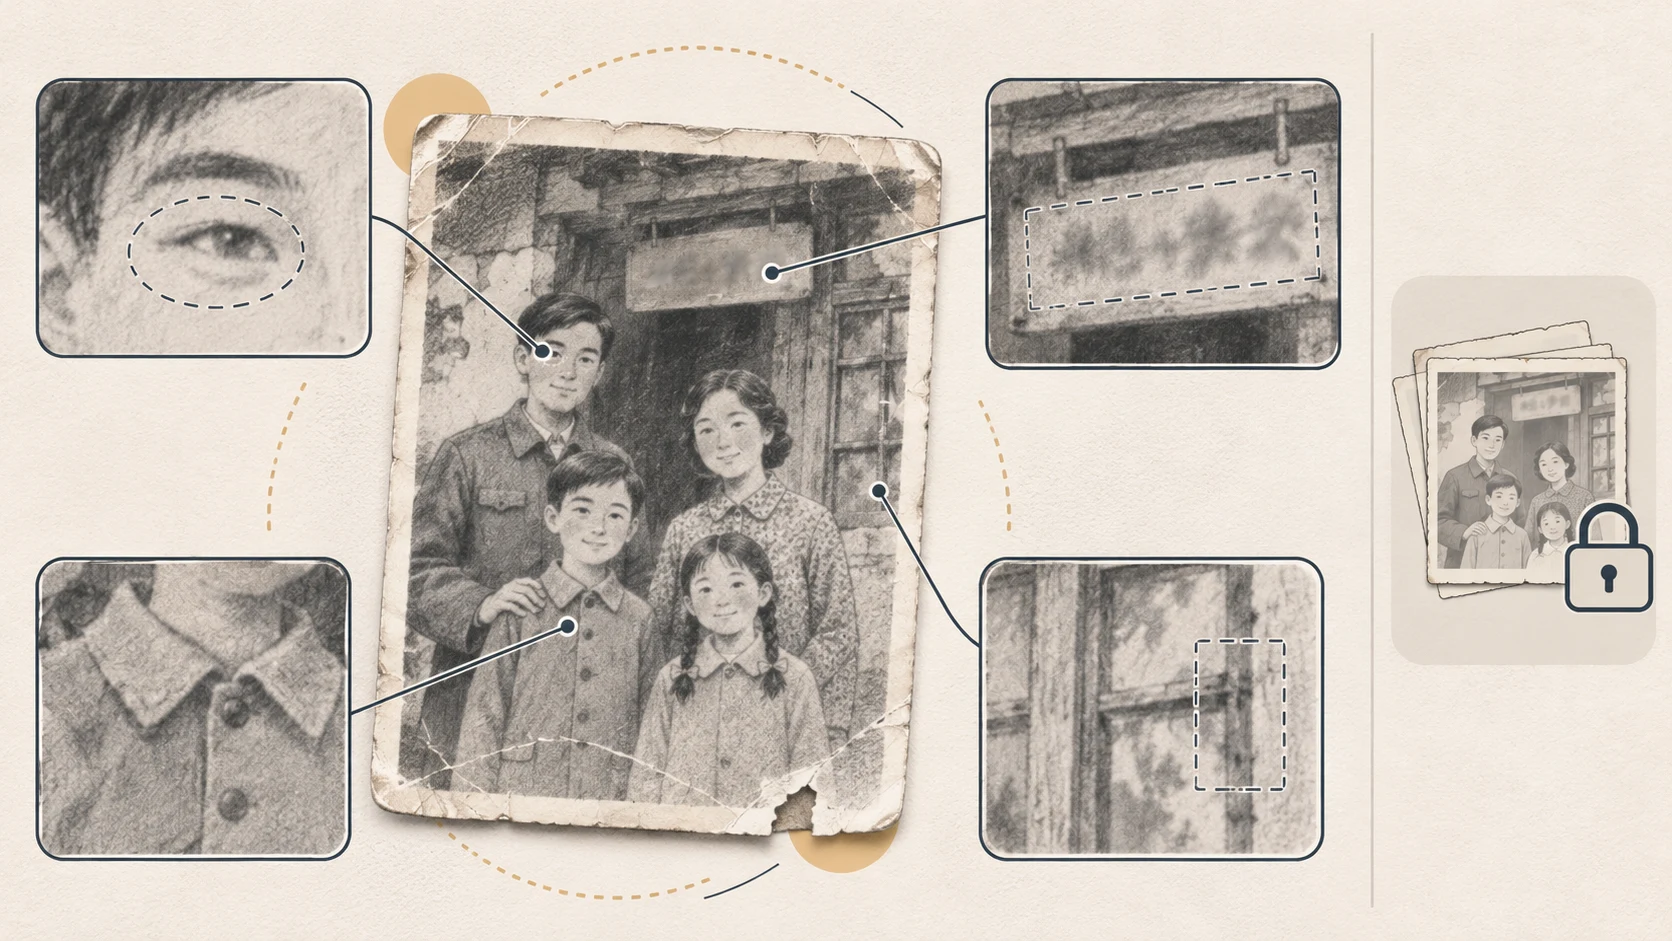
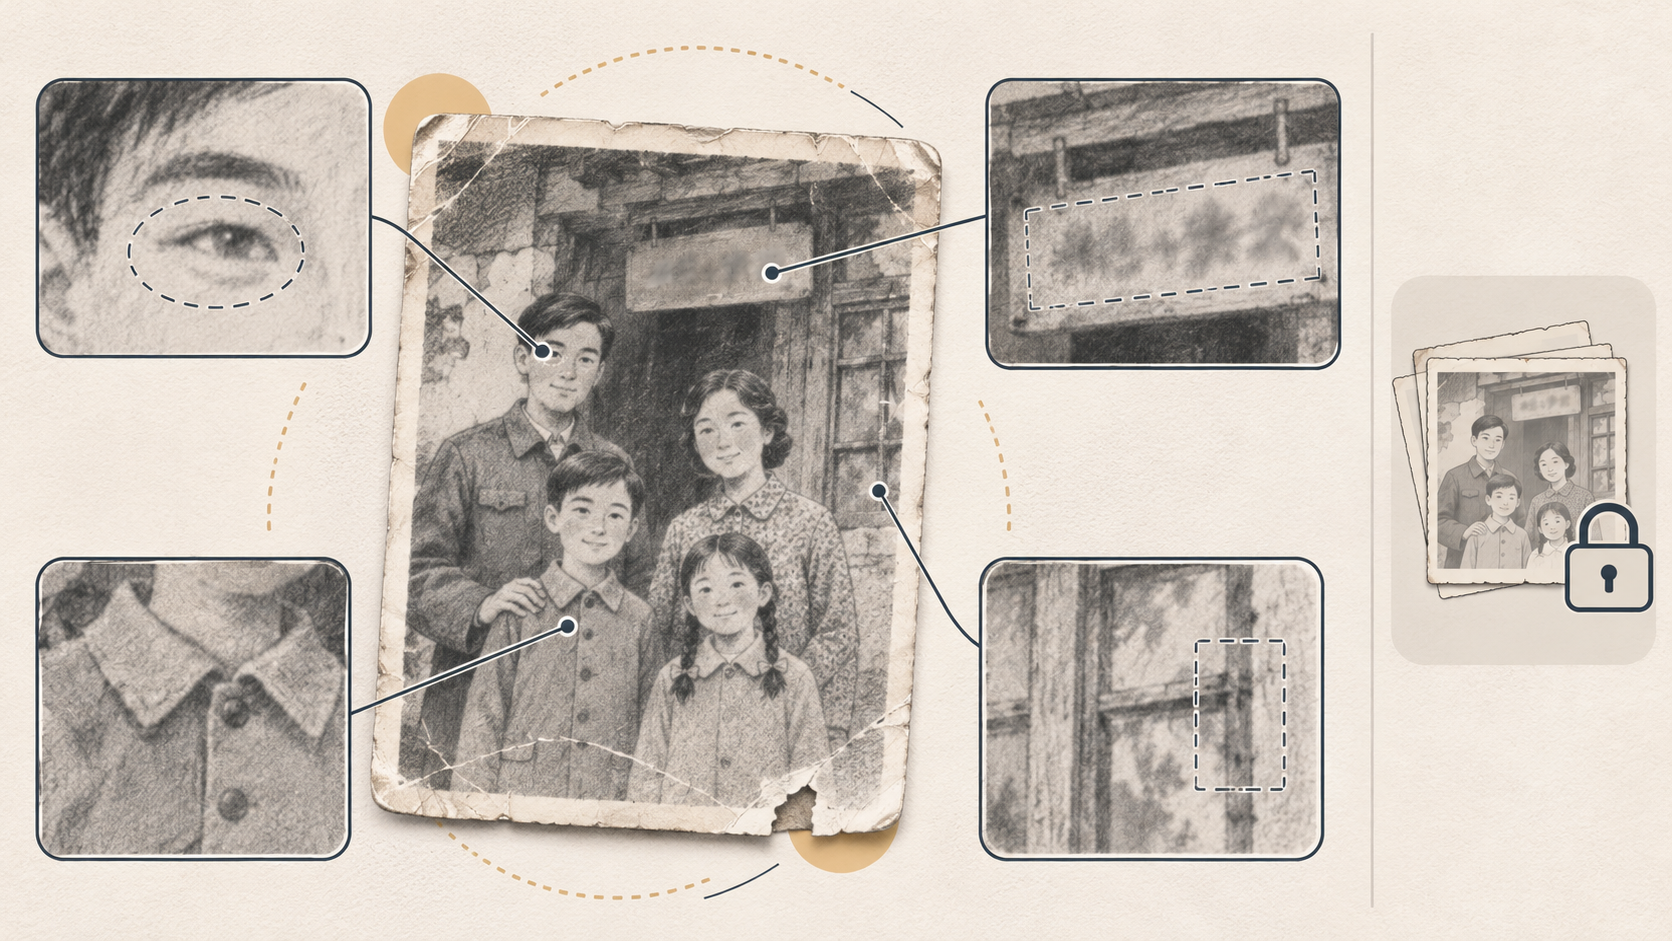
Once an old family photograph looks sharper, the newly visible details deserve another look: a grandmother’s eyes, a pattern on a collar, a sign above a doorway. They may be easier to read. They may also be plausible additions.
AI photo restoration involves two separate questions: is the picture easier to view, and is there evidence for the details it now shows? Improving the first does not establish the second.
PhotoGrid’s photo restoration page describes an upload, restore, and download workflow, and promotes colorization and facial enhancement. It illustrates common tasks in this category, but a product description cannot establish that missing details in an individual photograph have been recovered accurately. The approach below is editorial guidance, not a hands-on tool test.
Keep a version that editing cannot overwrite
If you have a paper photograph, scan it and preserve the unedited file. Check for glare, shadows from the edges, and skew. Where possible, improve the capture before asking an editor to compensate for capture problems. If you received an existing scan, keep that file separately rather than replacing it with an edited export.
Work on a copy and write down a narrow goal: “Treat the scratch in the upper-right corner; keep the image black and white; do not reconstruct faces.” Looking at the source before choosing a treatment helps keep default enhancement settings from deciding the task for you.
For an existing-image editing entry point, you can visit the InkRoom image editor. Check the operations currently available before deciding whether it suits your copy. This is a general editing entry point, not a claim that dedicated old-photo restoration, facial enhancement, or automatic colorization is available there.
Separate damage removal from reconstruction
Treat different problems separately and retain intermediate versions. If an unwanted change appears, you will have a better chance of identifying which edit introduced it.
| Source problem | Suggested first approach | Boundary to preserve |
|---|---|---|
| An identifiable scratch across a background | A small, local edit | A scratch crossing an eye or lettering requires greater caution |
| Noise and grain | Light treatment, compared against hair, skin, and fabric | Removing every trace of texture is not the goal |
| Blur with some surviving outlines | Cautious enhancement and structural comparison | Sharper texture is not evidence of accurate texture |
| A tear, missing corner, or unreadable area | Retain the damage, or make a separately labeled reconstruction | Missing content cannot be verified from the missing area itself |
| A request for a color version | Export colorization separately | Without independent evidence, do not call the colors original |
A line across a blank wall and a line across a pupil may both be scratches, but they do not present the same review problem. Ask whether the edit makes an unsupported decision about identity, wording, or clothing—not simply whether it looks clean.
Compare relationships, not just sharpness
Compare the original and edited image at the same display size, then inspect matching areas side by side at a larger scale. Different crops or zoom levels can mislead. Reviewing only the enlarged result makes it easy to mistake clarity for accuracy.
For faces, start with identity cues. Compare eye spacing, eyelids, mouth corners, hairlines, and the expression visible in the source. If the original contains only a blurred eye outline, newly rendered eyelashes or catchlights remain unverified. A relative’s recognition can add context; it does not validate every added feature.
For text, check character by character. Return to the source for signs, dates, and handwritten notes. Leave unreadable passages marked as unreadable. A fluent-looking inscription is not sufficient evidence for a location, date, or person’s name.
For clothing, check construction; for backgrounds, check placement. Have collars, buttons, badges, or patterns changed? Have windows, building edges, or distant people moved or disappeared? Record a specific uncertainty such as “left-chest badge unreadable in source; pattern present in edit,” rather than “details recovered.”
When a change lacks support, try a lighter edit, reduce its area, or keep the original blur or damage. Every part of the photograph does not need to reach the same apparent sharpness.
Deliver the uncertainty with the picture
Keep the original scan, the edited version, and a short change note. Save colorized or reconstructed versions separately. A comparison image should use matching crops and clearly identify the original scan.
For example, a note might read: “Scratch treated in upper-right background; left-eye detail cannot be verified from the source; clothing colors are interpretive.” This is an example of documentation, not a result from a test conducted here.
A family display may allow more visual interpretation. Identification, dating, and archival description call for stricter treatment of uncertainty. A restored version can help people view a photograph; it cannot make the source prove something it did not clearly record.
Related articles and cases
- AI Wedding Invitation Generator: Layout, Names, Dates, and Print Delivery
Turn a wedding brief into an invitation visual without treating the generated image as a finished invitation. Plan text hierarchy, verify event details, and prepare digital and print versions separately.
- How to Choose an AI Image Editing API: Inputs, Masks, Async Results and Cost
Evaluate an image editing API against delivery requirements, not just sample images. A developer-focused method for checking input contracts, recovering uncertain requests, testing preservation and reconciling actual costs.
- AI Floor Plan Generator: From Layout Ideas to Measurement Review
Turn room requirements into a conceptual layout without mistaking an attractive image for a measured plan. Learn what to describe, how to compare arrangements, and what to check against original measurements.
- AI YouTube Thumbnail Generator: From Content Promise to Mobile Readability
Turn a video's actual content into thumbnail concepts, compare meaningful layout alternatives, and check text, contrast, and focus on a phone. An illustrative example shows the method without claiming tested results.