AI Character Turnaround Generator: Align and Review Front, Side, and Back Views
Turn one character reference into a reviewable set of views by separating confirmed design from invented details, checking proportions and anatomical sides, and documenting what the back view cannot establish.
·
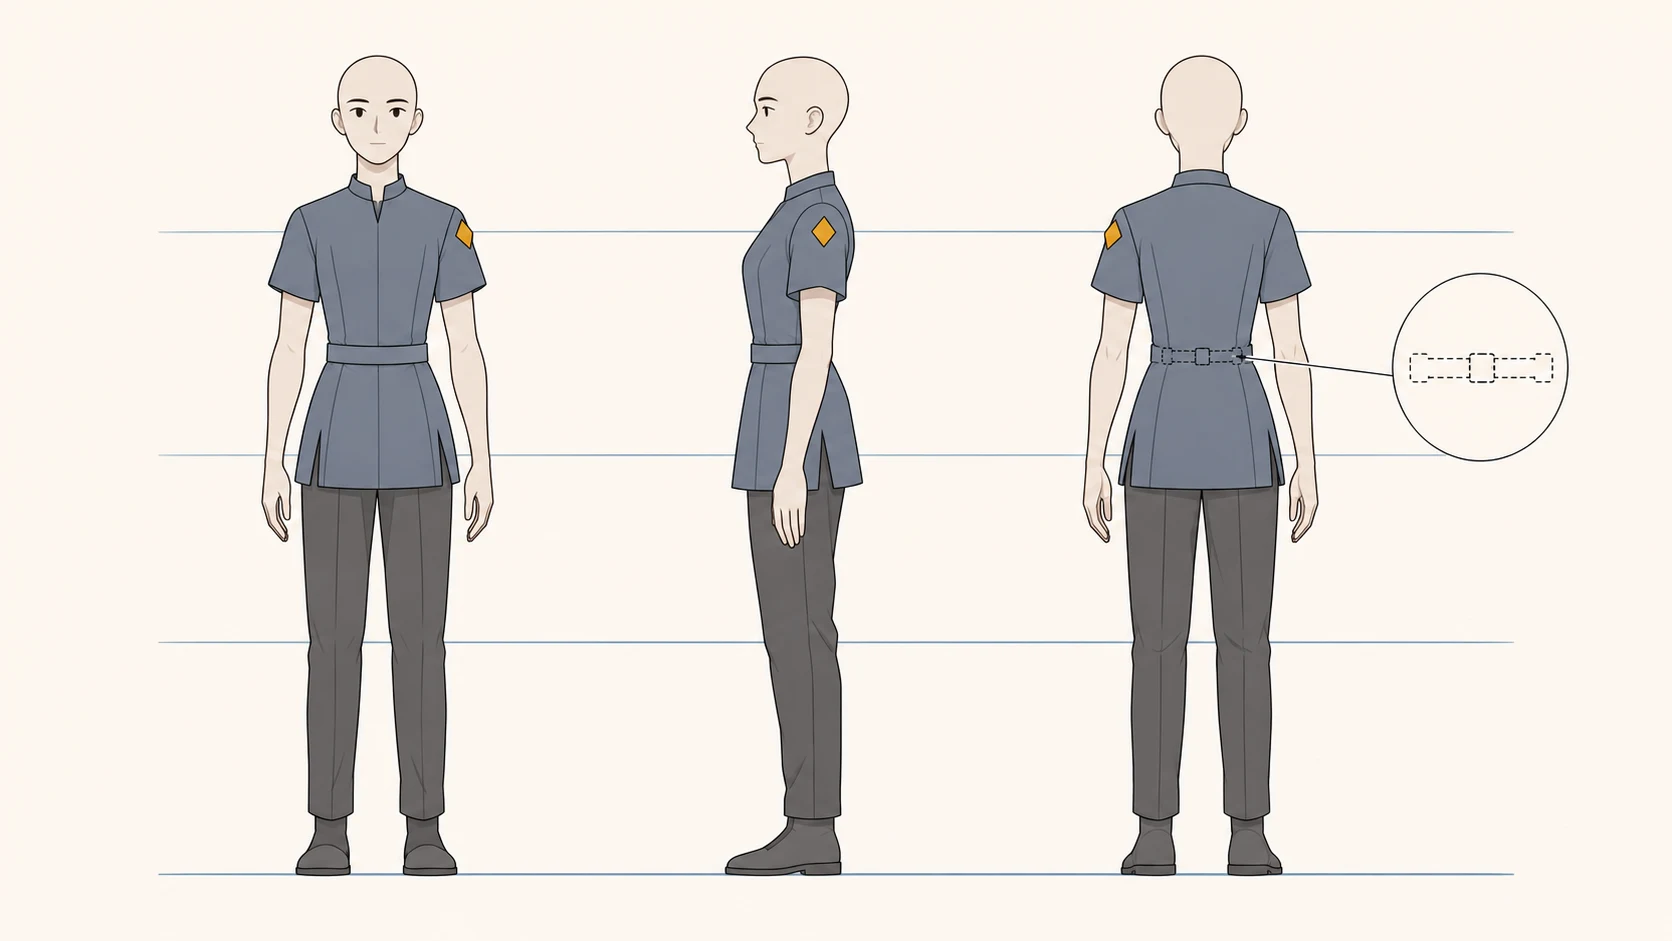
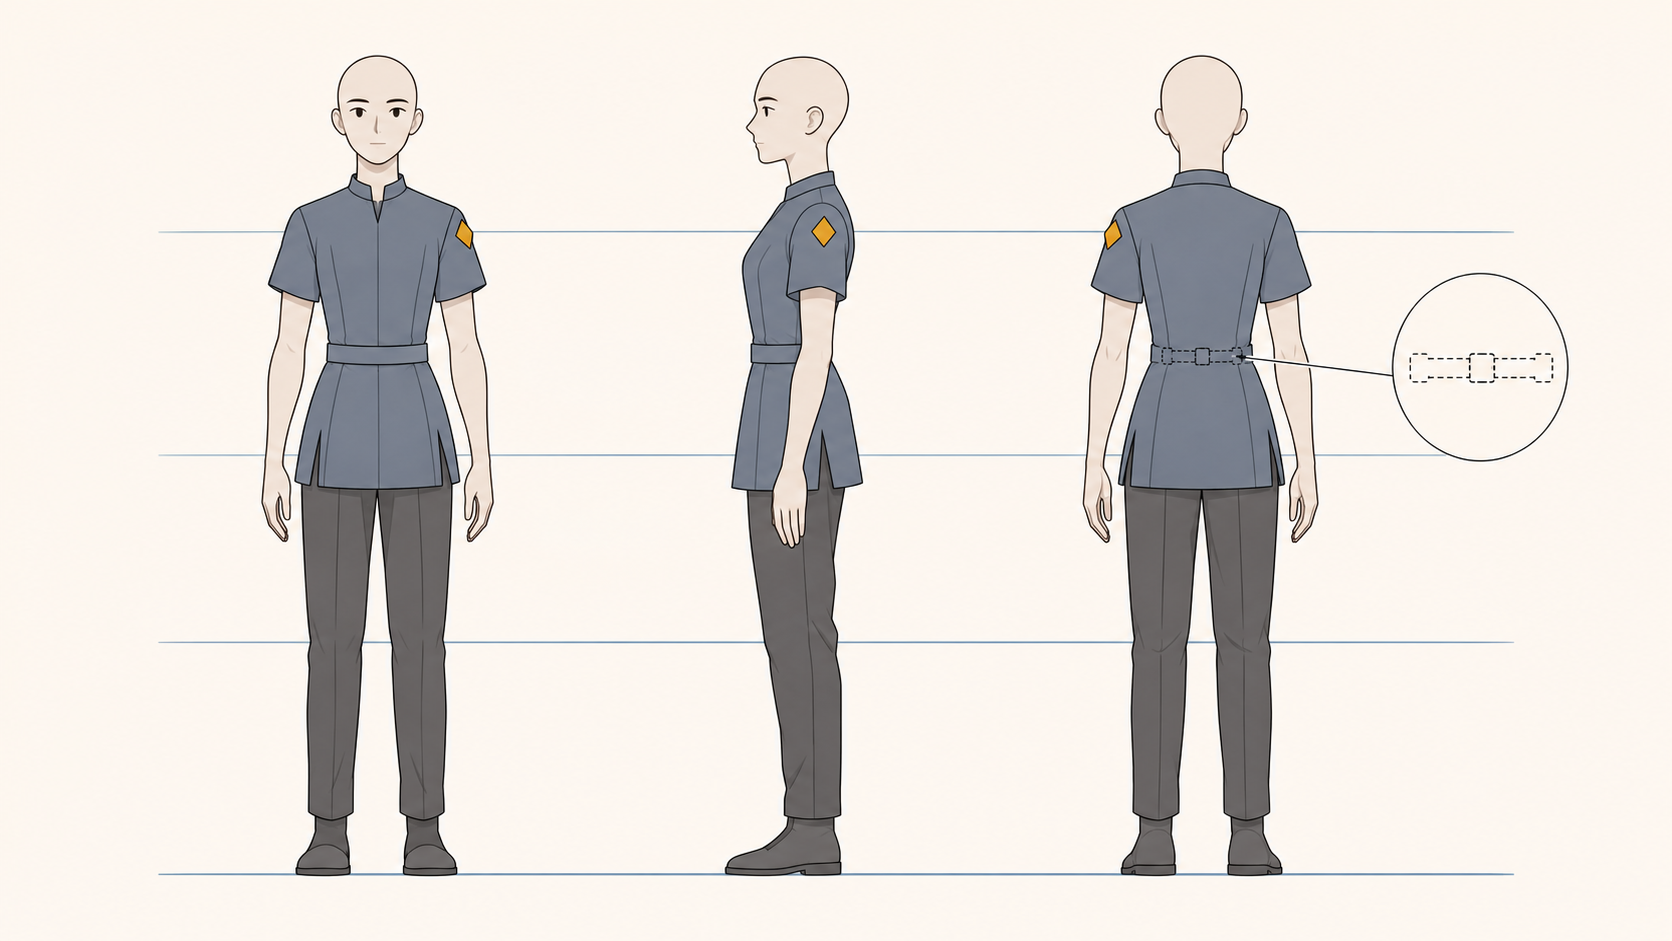
A front-view character image may establish a jacket’s color and chest accessories without showing how its straps connect behind the shoulders. With an ai character turnaround generator, the difficult part is not simply turning the character around. It is deciding what must stay fixed, what should change with the viewpoint, and what the model has invented.
For creators handing a design to a modeler or another artist, three attractive images are not enough. The useful deliverable is a set of views that describe one coherent design, with unresolved decisions still visible. The approach below is a production recommendation, not a tool test or a documented project outcome.
The back is a design question, not recovered evidence
Keep the original reference rather than letting a generated side or back view become the sole authority. Separate character information into three states: visible in the reference, confirmed by the creator, and undecided.
If a badge is visible on the character’s left shoulder, record it as character-left, not “the left of the image.” If the back is hidden, a rear badge remains undecided. A detailed output does not establish that it belongs to the original design.
This matters especially for asymmetry. When a character faces the viewer, character-left generally appears on image-right; in a rear view, that relationship changes. Track accessories by anatomical side rather than by their position on the page.
Specify which side profile you need. When the two sides have different details, one profile cannot document both. Add the other side or identify it as unshown.
Ask each edit to resolve one viewpoint
Choose a reference with the full body visible, an uncropped silhouette, and readable clothing details. Strong perspective or obscured limbs limit its usefulness as evidence of precise proportions. Ask the creator to confirm those proportions or supply a sketch before treating them as fixed.
Request one clearly defined view while keeping other design choices stable. Combining a new angle with a new pose, outfit, and lighting makes discrepancies harder to diagnose. This is a suggested instruction, not a tested prompt recipe:
> Use this image as the character design reference. Draw a full-body profile showing the character’s left side in a neutral upright stance. Preserve clothing layers, accessory placement, body proportions, and art style. Do not add decoration. Keep unseen structures simple and list them separately as design decisions needing approval.
The separate list is your production responsibility. Do not assume the tool can reliably identify unknown information or annotate it. “Do not add” is a request, not a substitute for review.
If you already have an image to modify, the InkRoom editing entry is a place to check the options currently available in the interface. The entry itself does not guarantee automatic turnaround alignment, character consistency, or accurate reconstruction of unseen details.
Scenario’s turnaround documentation describes requesting alternate views from an existing image and reviewing proportions, clothing, and pose alignment. That establishes the relevant problem space here; its tool sequence is not reproduced, and its features are not evidence of InkRoom capabilities.
Align the views, then examine structure before decoration
Place the views on one canvas. Preserve aspect ratios and use only uniform scaling and translation to make the ground line and overall height comparable. Do not stretch individual views into agreement. Different sole heights also need consideration before treating the bottoms of shoes as identical body landmarks.
Check pose compatibility first. A bent knee in one image and a straight leg in another can explain different knee heights. Likewise, distinguish the top of the hairstyle from the underlying head when judging proportions.
| What to inspect | Useful comparison | What does not establish consistency |
|---|---|---|
| Body proportions | Compare shoulder, hip, knee, and ankle heights in comparable poses; record positions relative to total height if useful | Equal image height does not establish equal limb length |
| Silhouette and volume | Check whether torso depth, head depth, hems, and shoes can describe the same design across views | Side-view width should not be forced to equal front-view width |
| Asymmetric accessories | Follow character-left and character-right, including attachment points | Moving across the page is not necessarily switching anatomical sides |
| Clothing construction | Compare collar, cuff, waist, and hem connections; flag concealed joins | Matching color and material do not establish matching construction |
| Rear details | Compare with creator-approved references; flag unsupported seams, straps, and graphics | A finished-looking back is not evidence of an established design |
For a repeatable record, you can note a landmark’s height above the ground divided by total character height. This is a review aid, not proof of accuracy. Perspective, pose, footwear, and landmark placement affect the comparison, so there is no universal pass percentage proposed here.
When correcting a mismatch, isolate one conflict at a time: an accessory on the wrong anatomical side, for example, or a cuff of inconsistent length. Return to the original reference and confirmed decisions after each revision. Comparing only with the previous generated image can quietly turn additions into assumed design facts.
A turnaround is not a cross-scene consistency test
A front–side–back sheet addresses what a design looks like from different directions. Preserving identity and clothing through new scenes, actions, camera distances, and lighting is a separate task.
Scenario’s documentation distinguishes character models from style models. The useful distinction is that a shared aesthetic alone does not establish shared character identity. No independent model test is reported here, and that distinction is not a guarantee of any tool’s cross-scene performance.
For handoff, include the original reference, the approved views, and unresolved design notes. A creator can choose a generated back design and make it official, but record it as a newly approved decision—not as an accurate recovery from a single front image. Keep unresolved strap connections or unshown accessories beside the relevant view rather than hiding them behind the phrase “consistent character.”
Related articles and cases
- AI Product Catalog Generator: Consistent Images, SKU-by-SKU Review
Keep product facts, visual rules, and catalog placement separate. This workflow explains how to test difficult images, map API outputs to SKUs, and document exceptions without treating successful generation as approval.
- ai vectorizer: How to Check Paths and Text After PNG-to-SVG Conversion
An SVG download is not proof of an editable vector asset. Learn what to inspect inside the file, how to check contours and text, and what changes when the result is headed for a large screen, print, or an icon.
- AI Image to 3D Model: How to Verify You Received a Mesh
Separate attractive previews from editable geometry, then assess the delivered asset in your target software. Includes suggested validation practices and API handoff records, not vendor performance claims.
- AI Menu Design Generator: Review Images, Names, and Prices Separately
A polished menu draft is not a verified menu. Use one approved dish record to review food images, names, prices, and dietary information, then check the mobile and printed versions separately.